클라우드
첫번째. Server 배포 heroku
두번째. Client(react 배포) vercel
첫번째. Server 배포 heroku
Cloud Application Platform | Heroku
Heroku is a platform as a service (PaaS) that enables developers to build, run, and operate applications entirely in the cloud.
www.heroku.com
회원가입 -> 로그인 후 -> create new app -> Heroku CLI 설치 -> deploy
LAMP-SHOPPING-SERVER
1. index.js(server.js에서 이름 바꿈, 원래 index.js는 index_node.js로 바꿈)
// 헤로쿠에서 포트 지정하는게 있으면 그 번호를 사용
// 없으면 8080포트를 사용
맨 위에
const port = process.env.PORT || 3001;구문 추가
2. package.json
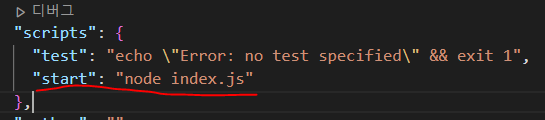
3. github에 올리기

4. heroku 로그인 후 create new app


Heroku CLI 설치하기

5. powershell에 치기

6. Open app 클릭


7. https://lamp-shopping-server-7ingout.herokuapp.com/products

server 배포 완료 ~
(이제 cleint 실행시킬 때 server 따로 실행 안시켜줘도 됨. server가 넷상에 있으니까 , ,)
LAMP-SHOPPING-CLIENT
8. config/contansts.js 파일 수정
export const API_URL = "https://lamp-shopping-server-7ingout.herokuapp.com";
9. sqlite 실행 후

LAMP-SHOPPING-SERVER
10. index.js imageUrl 주소 헤로쿠 주소로 변경

11. 다시 Server 배포 후 Client npm 새로고침
git add .git commit -m "헤로쿠서버 배포 준비 완료"git push heroku main
두번째. Client(react 배포) vercel
LAMP-SHOPPING-CLIENT
1. git에 올리기

2. vercel github로 로그인
Develop. Preview. Ship. For the best frontend teams – Vercel
Deploy web projects with the best frontend developer experience and highest end-user performance.
vercel.com
로그인 오류나서 문의 메일 답변 기다리는중
3. client import

4. CI=false react-scripts build
토씨 하나 틀리지말고 그대로 복사해서 붙일 것 !!
CI=false react-scripts build
CI=false react-scripts build
CI=false react-scripts build

5.

배포 완료 ~
'Stack > React' 카테고리의 다른 글
| [React] useMemo / useCallback (0) | 2022.07.05 |
|---|---|
| [React] Lamp 쇼핑몰 구현하기 8 (깃허브 주소 및 최종 코드) (0) | 2022.07.05 |
| [React] rest (0) | 2022.07.05 |
| [React] Lamp 쇼핑몰 구현하기 6 (삭제기능 / carousel 구현) (0) | 2022.07.04 |
| [React] Lamp 쇼핑몰 구현하기 5 (이미지 업로드 / 상품등록 기능 구현) (0) | 2022.07.04 |